Check out my building blog to learn more about construction for your home or office in Austin! David L. Traut, President, CAPS Certified (512)444-0097

Kitchen Cabinet Remodel Austin, Texas

Posted byDavid L. Traut, CAPS on Fri, May 14, 2010 @ 16:05 PM

      Know that a kitchen remodel is not a DIY situation and that you will need to consult with a residential remodeling professional at some point. Be sure to choose a local qualified kitchen remodeling contractor whose personality and qualifications are agreeable with you personally.  Check out the reviews on the company to find out how clients have responded to their experiences. You are about to undertake a very important short term relationship in your life with someone you may know by reputation only.  The relationship needs to be comfortable and free flowing thus enabling the contractor's creativity level to be at it's highest during your remodeling project. Look at it as a partnership between your needs and the remodeling contractor's abilities.  The use of many finishes must be accommodated for.  His professional remodeling experience will include the capacity to identify many construction limitations and hazards.  These variables underlie the major pitfalls that can be possibly avoided while enabling a remodeling design to come to reality.  Don't forget that you get what you pay for and it certainly isn't about the lowest bid but the remodeling company's integrity and knowledge.  Some CAPS certified remodeling companies have the experience and education to assist you in accomplishing remodeling upgrades that include accessibility or disability issues.  It is important that the job flows between the various trades involved to produce a better final outcome.  This too is a reflection on his remodeling experience for which there is no substitute.

Certified Aging In Place Specialist

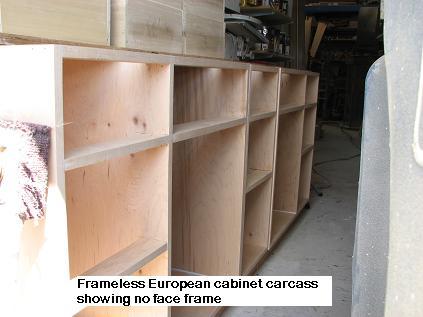
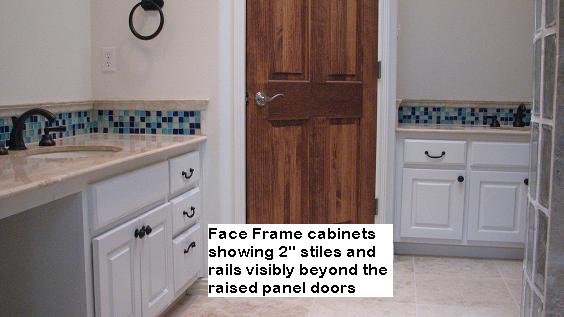
     Fine Kitchen Cabinetry in Austin, Texas is about the cabinet carcass and the finishes applied to it's front making up a Northern face frame or a frameless European look of your fine cabinetry.  Each type will accommodate mounting doors using a concealed cup Euro 32 mm bore hinge and installation is accomplished by varying the type of mounting plate that attaches to the carcass. The mounting plates are specific for the design once the doors are applied in an overlay fashion.  If the doors are recessed to be flush with the carcass face then other types of hinges can be used such as wrap around or door stile bore types.  Non concealed hinges come in many forms such a strap, Youngdale kerf units, flush, or offset and are used to create a certain style such as an antique look.  These hinges also come in many finishes like brass, chrome, or black to name a few.

Kitchen Remodeling


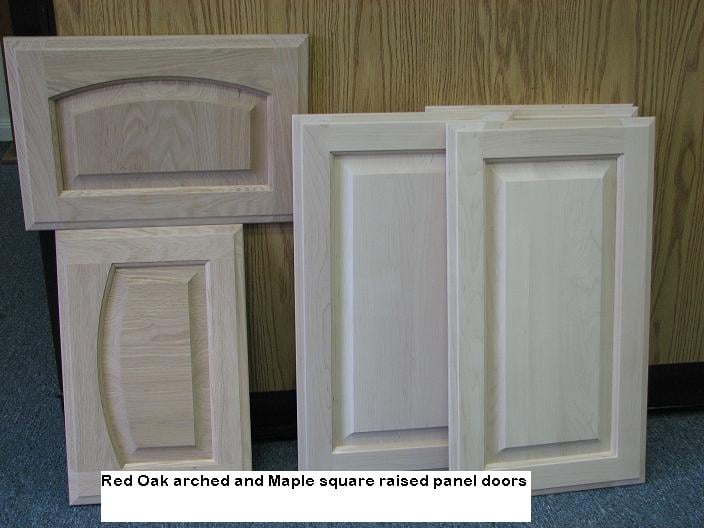
  • Door styles include Flat Panel, Raised Panel, Shaker, Lip Molded, and Slab
  • We Create Interesting Cabinets by Varying Both The Height and Depth Along a Cabinet Line
  • Featuring Red or White Oak, Poplar, Alder, Cherry, Walnut, Maple, Birch, Ash, Pecan, and many other Exotic Wood Species
  • We offer full extension drawers with SOLID WOOD construction for durability mounted on ball bearing guides
  • Our cabinets contain fully adjustable shelving supported by metal pilasters
  • Many choices of hinges are available from concealed 32mm hidden hinges by Blum or many other surface mounted varieties
  • Many convenient pullout options for convenience and clutter reduction are available used for  pantries, trash cans, mixer lifts, or under sink storage to name just a few


     Frameless European cabinets can either be wooden or covered in plastic laminate per your choice for your Austin kitchen remodel.  The laminated application makes for a cleaner application and provides for easy maintenance.  These doors are flat with no crevices to conceal grease and grime. 

     If you go for the wooden look there are many choices from which to choose.  These include a slab as above with the edges banded with heat tape or a 1/4" rip of the same wood specie as the door, a flat slab using a lip molding on the edge creating a 3/8" offset door, a raised panel with a 3/4" insert, a flat panel with a 1/4" insert, or a Shaker style with a varying divisions of the face.

     Any of these will work for a kitchen or bathroom cabinet remodel Austin, Texas and it is truly a personal preference.  So whether you are furnishing a new kitchen or bathroom space or are going for a kitchen or bath upgrade be sure you consider all the possibilities and design the room for function.

Fine Cabinetry


Raised Panel Doors Can Be Square, Single, or Double Arched

Raised Panel doors in Austin Texas

Bathroom Remodeling Austin

Tags: Austin, Texas, fine kitchen upgrades, how-to, fine cabinetry, kitchen cabinetry, fine bathroom upgrades-bathroom cabinetry, face frame, European, kitchen cabinets Austin Texas, kitchen cabinets Austin, bathroom cabinets Austin Texas, fine cabinetry in Austin,, kitchen cabinet remodel Austin, Texas, fine cabinetry Austin, fine cabinetry in Austin, Texas, bathroom cabinetry Austin, Texas

Fine Cabinetry in Austin, Texas

Posted byDavid L. Traut, CAPS on Tue, May 04, 2010 @ 10:05 AM


     If you plan to remodel the ‘food production room’ in your home, then choosing your kitchen cabinets is probably going to be part of the plan. Not surprisingly, kitchen cabinetry is up for scrutiny in terms of the modernization tsunami changing home décor trends in recent times.

     Modern cabinets are breaking away from the ornate design found in traditional cabinet styling, rather reflecting minimal trends such as simple, clean design features. Streamlining and modernizing kitchen cabinetry works in tandem with other kitchen furnishings such as new-age countertops and complimentary backsplashes.

Certified Aging In Place Specialist

     To determine what style of kitchen cabinets are in your home you need to look  directly into their face beyond the doors.  Are they the face frame North American type or are they the European frameless version?  Fine cabinetry comes in many choices to suit your desires.

     The face frame North American type has long been a popular cabinet style.  It is characterized by the plywood cabinet box, or carcass, having a 3/4" thick hardwood front frame  application of 1 1/2"-2" widths.  These are present on both the vertical components, or stiles, and on the horizontals called rails.

     The frameless European style is just the carcass without any face frame yielding only a 3/4" outward appearance at the stiles and rails.  Both the frameless and the face frame styles use the same carcass body enabling the same European hinges, drawer guides, and cabinet legs to be used.

     The greatest difference is seen once the door or drawer fronts are mounted on fine cabinetry in Austin, Texas.  The European frameless type makes the adjacent door spacings smaller showing less of the stile beyond.  The framed units have more space between the door applications showing more of the stiles and rails beyond. 

    Frameless is a little less expensive to construct than the face frame style so that it really becomes a matter of personal preference and different styles can be mixed within the same house using one type in the kitchen and the other in the bath.

A Typical European Cabinet Design

Custom European Cabinetry in Austin, Texas

Typical Face Frame Look

Face frame cabinetry in Austin, Texas

Fine Cabinetry

     Typically bathroom vanities are 21" deep and approximately 29" tall. The depth is not a problem but most folks would prefer a universal design height of 34".  This height will work for your son or your father making the vanity more accessible to all.   Fine cabinetry is a must for any bathroom makeover.  As for the vanity, you can work your way down from the upgraded cabinet top that has been installed at the correct height for you.  The vanity should have adequately accessible storage satisfying your needs.  Incorporating  easy operating and properly sized drawers and pull out shelves within the design can be very beneficial.  Linen, medicine, and "over the potty" wall cabinets need to be well thought out. The correct species of wood used for the construction of your fine cabinetry and the style of you cabinet doors are two very important factors to consider.  Remember, you do have a choice and you are going to be looking at these new cabinets for a while.

     There are basically two styles of ADA vanities that comply with an unobstructed 27" tall roll under area below the sink.  ADA sinks with a rear drain location provide for better plumbing drain hook ups.  This modification has everything to do with both the water supply lines and the waste line connecting the sink.  There must be provisions made to protect the user from being scalded when coming into contact with any one of the plumbing pipes serving the sink.  These connecting pipes may become heated merely by the water passing through them creating the problem.  The open type model should always receive both waste and supply insulating jackets applied directly to the pipes providing protection for the wheelchair user.  The closed model concealing the pipes will be equipped with a removable face or face board covering the pipes.  This pipe concealing panel must be installed at the correct wheelchair user clearance angle.  This allows for the needed unobstructed legroom required for the  user.  The vanity can extend beyond the sink but the area containing the sink is required to have this roll under capability.  This section of the vanity top must not be any taller than 34 inches above the finished floor with sufficient lower leg clearance.  Clear unobstructed reach distances around the counter top area must be observed.  Any motion controlled sensors integrated into the various dispensing devices and/or plumbing fixtures throughout the restroom present a true hands free benefit to all the restroom users.  If these aren't in the budget then at least wrist handles used for controlling the faucet can be incorporated into the design of the vanity.  Furthermore, automatic flush valves should be used on all toilets and urinals that provide for hands free use.

Austin ADA Vanity

    A completely serviceable special needs bathroom must contain at least one ADA vanity and the accessible route must be defined.  The vanity must be one with a clear underneath scald protected area having an unobstructed roll under capability for wheelchairs.  These new residential vanities do not need to look institutional.  They can be designed like any other piece of fine furniture.  A five foot turning radius allowing the wheelchair to maneuver into any approach must also be associated with the ADA vanity.  A 36x48" clear approach area to the vanity must be observed and this can overlap the five foot turning radius.  The area of travel will then be enhanced by an unobstructed clear accessible barrier free route dedicated to reaching the vanity. 

Tags: Austin, Texas, kitchen makeovers, how-to, fine cabinetry, kitchen cabinetry, face frame, frameless European, European, kitchen cabinets Austin Texas, kitchen cabinets Austin, remodeling kitchens, fine cabinetry in Austin,, kitchen cabinet remodel Austin, Texas, fine cabinetry Austin, fine cabinetry in Austin, Texas, bath cabinets Austin, Texas

Home Remodeling Austin, Texas(part 3 0f 3)The Envelope

Posted byDavid L. Traut, CAPS on Mon, Mar 08, 2010 @ 18:03 PM

     Now that you've worked so diligently to attain the most efficient envelope for your building it's time to consider the finer points and a few energy minded construction techniques. This is why home remodeling Austin, Texas is a unique problem and furthermore why professional residential remodelers exist.   From here on out you will be dealing  with the penetrations going through your envelope perimeter that are deducting from all your efforts.  These areas include not only the electrical boxes, wires,  pipes, and registers that are coming through your walls, floor, and ceilings,but in particular the doors and windows that connect us to the outside.

     Austin house remodeling criteria demand that any penetrations concerning your utilities must be dealt with using expanding foams, caulks, or gaskets that limit infiltration into your envelope.  You can use clear paintable caulks in conjunction with all your interior trim eliminating small leaks that add up to large problems.  You can also caulk your A/C buckets to the ceiling before replacing the grilles.  Use insulation dams above attic stair units and weatherstrip the pull down door to the ceiling.  Repeat this procedure at any additional attic skuttles within your building.

     Your return air closet can also be a conditioned air thief.  Caulk all inside corners of the closet and seal your air handler to the platform it rests upon.  Weatherstrip the closet door.  If you have a gas furnace you can either remove the closet ceiling or install combustion air pipes that connect the closet to the unconditioned attic above.

     Now to attack the most wasteful of all the efficient envelope penetrators that connect us to the great outdoors-your windows. They make up a great percentage of surface area in your now upgraded and insulated exterior walls.  You must access whether or not to replace the original leaky windows and what value they add while preserving the look of your exterior.  If you choose to keep them, either efficient storm windows or insulating shutters may be installed on the interior. If, on the other hand, you favor replacing them always remember a good rule of thumb.  A single pane of glass only offers an R-1 resistance to the outside.  You are basically dealing with aesthetics  so don't be taken in by all the bell and whistle talk.  The main specification to consider is the E-factor concerning how well light is transmitted  into the building helping with direct gain problems during the summer months.

     All solid exterior doors offer insulating qualities through their makeup and must be weatherstripped.  If your doors contain glass inserts treat them as windows installing insulating shutters on the interior or a storm door on the exterior. Any penetrations through the conditioned envelope reduces it's total efficiency. 

Energy Efficient Building Techniques

Tankless Hot Water Heaters DON'T Waste Energy Heating Water

Energy minded tankless water heaters in Austin, Texas

Check out Part 1: Ceilings which covers your attic wastes

Check out Part 2: Walls which covers your wall R-factors and underpinning

 Phote Credit: Compact fluorescent...By Mike Dykstra

Tags: how-to, efficiency, aging in place home improvements in Austin, older structures, energy minded construction, handicap home modifications, home remodeling, accessibility home remodeling in Austin, accessible home remodeling, home modifications for independent living, elder construction, home modifications Austin, Texas, home improvements Austin,, accessibility remodelers in Austin, house remodeling Austin, home remodeling Austin, Texas, house remodeling Austin, Texas, home remodels Austin, home modifications for independent living Austin

Home Remodeling Austin, Texas (Part 2 of 3) Walls

Posted byDavid L. Traut, CAPS on Mon, Mar 08, 2010 @ 18:03 PM

    Now that you've taken care of the energy being wasted "through the roof" how about those walls and what energy minded construction techniques can be utilized?  What type of construction makes up your walls and what are the best ways to go about eliminating some of the waste caused by air infiltration?  Let's define what home remodeling Austin, Texas means.

    Any remodeling contractor will tell you that Very old buildings have wall construction which is limited only by the materials that were available at the building sight for any specific time. These structures were normally composed of sod, masonry,  or logs that were chinked  with mud set into their joints relying on the principle of thermal massBy building thicker walls the same logic of the R-factor was used.  It took longer for outside temperatures to transfer into the building through these massive resistant walls into the living space.   

    Once lumber became available it was used at a premium.  The presence of clapboard or weather board construction came about using one by (one inch thick) boards in varying widths on  both sides of a 2x4 stud forming the outside walls. 

    The joints between the boards allowed air to infiltrate the building.  Batten boards were nailed over these joints on the exterior to eliminate some of the air flow and  later cheesecloth covered by wallpaper was applied on the inside boards.  The walls still had too much air infiltration relying on the dead air space and the composition of the wood itself to comprise the R-factor.  Finally 1/4" sheetrock was applied over the wallpaper as a first generation drywall application.

     If this clapboard system is plaguing your building you must access which side of the wall you need to attack.  Do you need new exterior siding that allows you to install and bury additional rigid insulation or desire a newer looking drywall finish on the interior? The only way to gain access to your stud space for applying batt insulation is to remove one side of the clap boards.  The kraft face must be turned toward your living space to create a vapor barrier against the outside and R-13 is the thickest product you can place in a four inch cavity.  Don't be misled by an offer using a blown in product that can be held up by wiring and never reach the bottom of the wall cavity which defeats the whole process.

     Once you have accomplished this task you have helped to maintain your envelope but you need to look down.  If your floor is on a pier and beam structure do you have an underpinning present?  It's purpose is to stop the wind from robbing you of additional infiltration from below your floor.  If present, the underpinning can eliminate having to install insulation between your floor joist.  It acts by literally raising the constant temperatures that existing naturally below ground.  This natural occurence will temper the crawl space beneath your floor joists and prevent energy robbing infiltration.  You now have a reasonably efficient envelope given your existing situation.

Check out Part 1:  Ceilings which covers your attic wastes

Check our Part 3:  The Envelope covering penetrations and their energy wastes

Photo Credit: Energy Savings By Prophet of the Haze

Energy Savings!

Tags: how-to, efficiency, aging in place remodeling, aging in place, aging in place home improvements in Austin, older structures, energy minded construction, home remodeling, accessibility home remodeling in Austin, disability home remodeling in Austin, home modifications for independent living, aging in place specialist, aging in place services, aging in place design,, disability home modifications in Austin, home modifications Austin, Texas, home improvements Austin,, house remodeling Austin, home remodeling Austin, Texas, house remodeling Austin, Texas, home remodels Austin

Home Remodeling Austin, Texas (part 1 of 3)Ceilings

Posted byDavid L. Traut, CAPS on Mon, Mar 08, 2010 @ 17:03 PM

     So you have recently purchased or already own a building with character but feel like it's wasting your hard earned money causing high energy bills.  What are some of the best and most cost energy minded construction techniques in Austin, Texas  you can use to help lower those "through the roof" expenses? You need to understand primarily that your ceiling is the only common denominator between your costly conditioned living space and the root of your problem---the attic.

     The greatest retrofit solution concerning home remodeling Austin, Texas is the resistance factor (R-factor) you can add above your ceiling in the form of insulation to slow down temperature exchanges and the amount is determined only by the space that you have.  If you own a building without any insulation then insulating the ceiling above the walls and floor causes the most radical changes in the way the structure responds to temperature differentials. Lay in Kraft faced batts with the paper next to your ceiling to create a vapor barrier.  If your attic has old preexisting insulation add more on top of this in the form of unfaced batts running perpendicular to your ceiling joists or apply the blown in type. 

      Remember that insulation works best when there is air surrounding each of the fibers or filaments comprising it's makeup that forms the resistance.  Settled and stomped down areas defeat the purpose by transferring temperature easier between the fibers themselves that are touching one another. Think of your attic as a heat producing battery that pushes the summer heat down through your ceiling into the conditioned space.  The air expands as the temperature increases and once the attic ventillation is overcome by sheer volume it continues to hold that increasingly heated air only to transfer the heat directly through your ceiling causing your A/C to cycle more often.  Conversely in the winter the cold intrinsic attic air takes advantage of the principle of heat rising and becomes a collecting sponge for your expensive heated air.  The presence of adequate insulation fixes both situations because the greater the R-value the better the fix.


Check out Part 2: Walls covering R-factors within your walls

Check out Part 3: The Envelope covering penetrations and their energy waste

Photo Credit: lightbulb By trulyshyazn

Energy Minded

Tags: how-to, efficiency, older structures, energy minded construction, home remodeling, home modifications for independent living, handicap remodeling contractors in Austin, handicap remodeling contractors, home modifications Austin, Texas, home improvements Austin,, accessibility remodelers in Austin, house remodeling Austin, home remodeling Austin, Texas, accessibility designs Austin Texas, house remodeling Austin, Texas, home remodels Austin, home modifications for independent living Austin